Pixels to Print: Perfecting the Preflight Panel
- NorthPoint

- Aug 6, 2020
- 3 min read
Have you ever printed or submitted a piece of work only to later notice that a sentence was cut off, an image printed much more blurry than expected, a link or font was missing, or an incorrect color setting was used by mistake? These types of mistakes happen much more often than one would like, and we can certainly say that we have all been there!
Now what if I told you that InDesign has a way to prevent these mistakes from happening in the first place, long before submission or printing. The worry and hassle of remembering to double check these often-overlooked details can be completely taken away with the help of a special tool that is known as the preflight panel.
The preflight panel can essentially perform a quality check on your document while you are working on it to warn you of problems that can prevent you from printing or outputting as desired. This would include things like missing files or fonts, low resolution images, overset text, and much more!
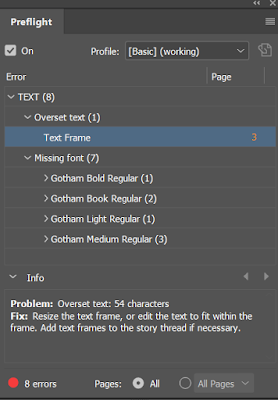
If while working on a project a red light appears on the bottom left of your document, with “error” next to it (seen in example photo below), you know that there is a mistake in your document that you may not have caught. This is InDesign preflighting your document in the background, searching for and informing you of errors. If you double click on this red light, the preflight panel pops up with a list of the specific errors in your document. As seen in this example below, 8 errors are listed in the preflight panel; one for an overset text error, which is shown in the textbox on the right page, and 7 for missing font files, which can be seen by the red highlighted text throughout the document.

Another great feature of the preflight panel is that if you click on the line with the error listed, the info area below will tell you exactly what is wrong (in this case the text is 54 characters overset) and a solution to fix it. If you click on the page number of where the error is located, it will also jump you straight to the page and area of where the error is so that you can make the fix more efficiently.
InDesign automatically sets the preflight profile to basic, which covers general errors like missing links and fonts and overset text, but there is also the option to create your own customized preflight profile to look for more specific errors that might be more applicable to your project.
To open the Preflight Profile window, click on the preflight panel flyout menu, and select “Define Profiles”. Here, you will see drop down lists of different areas within your document that can be checked for errors. To create your own Preflight Profile, click the + button on the bottom left of the window, and check all of the boxes of specific things that you would want to check for errors. For example, you can add color errors, such as the use of registration instead of black, or even image errors, where you can set a specific minimum or maximum resolution and check for anything that might be outside of that range.

The possibilities are truly endless with the preflight panel! And while proofreading and double checking your work is always encouraged, the preflight panel helps tremendously with the stress of the possibility of skipping over errors that could make or break your final document. If you aren’t already taking advantage of it, now is your chance to hop on the train of preflight perfection!


Comments